How to Set Up GTM Cookie Tracking (and Better Understand Content Engagement)

How to Set Up GTM Cookie Tracking (and Better Understand Content Engagement)

How to Set Up GTM Cookie Tracking (and Better Understand Content Engagement) 1920 1275 Joel.Mesherghi

Posted by Joel.Mesherghi

The more you understand the behaviour of your users, the better you can market your product or service — which is why Google Tag Manager (GTM) is a marketer’s best friend. With built-in tag templates, such as scroll depth and click tracking, GTM is a powerful tool to measure the engagement and success of your content. 

If you’re only relying on tag templates in GTM, or the occasionally limiting out-of-box Google Analytics, then you could be missing out on insights that go beyond normal engagement metrics. Which means you may be getting an incomplete story from your data.

This post will teach you how to get even more insight by setting up cookies in GTM. You’ll learn how to tag and track multiple page views in a single session, track a specific set number of pages, based on specific on-page content elements, and understand how users are engaging with your content so you can make data-based decisions to better drive conversions.

Example use case

I recently worked with a client that wanted to better understand the behavior of users that landed on their blog content. The main barrier they faced was their URL structure. Their content didn’t live on logical URL structures — they placed their target keyword straight after the root. So, instead of example.com/blog/some-content, their URL structure looked like example.com/some-content.

You can use advanced segments in Google Analytics (GA) to track any number of metrics, but if you don’t have a logically defined URL, then tracking and measuring those metrics becomes a manual and time-consuming practice — especially when there’s a large number of pages to track.

Fortunately, leveraging a custom cookie code, which I provide below, helps you to cut through that time, requires little implementation effort, and can surface powerful insights:

  1. It can indicate that users are engaged with your content and your brand.
  2. The stored data could be used for content scoring — if a page is included in the three pages of an event it may be more valuable than others. You may want to target these pages with more upsell or cross-sell opportunities, if so.
  3. The same scoring logic could apply to authors. If blogs written by certain authors have more page views in a session, then their writing style/topics could be more engaging and you may want to further leverage their content writing skills.
  4. You can build remarketing audience lists to target these seemingly engaged users to align with your business goals — people who are more engaged with your content could be more likely to convert.

So, let’s briefly discuss the anatomy of the custom code that you will need to add to set cookies before we walk through a step by step implementation guide.

Custom cookie code

Cookies, as we all know, are a small text file that is stored in your browser — it helps servers remember who you are and its code is comprised of three elements:

  • a name-value pair containing data
  • an expiry date after which it is no longer valid
  • the domain and path of the server it should be sent to.

You can create a custom code to add to cookies to help you track and store numerous page views in a session across a set of pages.

The code below forms the foundation in setting up your cookies. It defines specific rules, such as the events required to trigger the cookie and the expiration of the cookie. I’ll provide the code, then break it up into two parts to explain each segment.

The code


Part 1

Explanation:

The second part of this script will count the number of page views:

  • The “CSS SELECTOR GOES HERE”, which I’ve left blank for now, will be where you add your CSS selector. This will instruct the cookie to fire if the CSS selector matches an element on a page. You can use DevTools to hover over an on-page element, like an author name, and copy the CSS selector.
  • “y” represents the cookie and "NumberOfBlogPagesVisited" is the name I’ve given to the variable. You’ll want to iterate the variable name as you see fit, but the variable name you set up in GTM should be consistent with the variable name in the code (we’ll go through this during the step-by-step guide).
  • “createCookie” is the actual name of your cookie. I’ve called my cookie "BlogPagesVisited." You can call your cookie whatever you want, but again, it’s imperative that the name you give your cookie in the code is consistent with the cookie name field when you go on to create your variable in GTM. Without consistency, the tag won’t fire correctly.
  • You can also change the hours at which the cookie expires. If a user accumulates three page views in a single session, the code specifies a 12 hour expiration. The reasoning behind this is that if someone comes back after a day or two and views another blog, we won’t consider that to be part of the same "session," giving us a clearer insight of the user behaviour of people that trigger three page views in a session.
  • This is rather arbitrary, so you can iterate the cookie expiration length to suit your business goals and customers.

Note: if you want the event to fire after more than three page views (for example, four-page views) then the code would look like the following:

var y = {{NumberOfBlogPagesVisited}}
if (y == null) {
createCookie('BlogPagesVisited',1,1);
}
else if (y == 1) {
createCookie('BlogPagesVisited',2,1);
}
}
else if (y == 2) {
createCookie('BlogPagesVisited',3,1);
}
else if (y == 3) {
var newCount = Number(y) + 1;
createCookie('BlogPagesVisited',newCount,12);
}
  
if (newCount == 4) {
dataLayer.push({
'event': '4 Blog Pages'
});

Now that we have a basic understanding of the script, we can use GTM to implement everything.

First, you’ll need the set up the following "Tags," "Triggers", and "Variables":

Tags

Custom HTML tag: contains the cookie script

Event tag: fires the event and sends the data to GA after a third pageview is a session.

Triggers

Page View trigger: defines the conditions that will fire your Custom HTML Tag.

Custom Event trigger: defines the conditions that will fire your event.

Variable

First Party Cookie variable: This will define a value that a trigger needs to evaluate whether or not your Custom HTML tag should fire.

Now, let's walk through the steps of setting this up in GTM.

Step 1: Create a custom HTML tag

First, we'll need to create a Custom HTML Tag that will contain the cookie script. This time, I’ve added the CSS selector, below:

 #content > div.post.type-post.status-publish.format-standard.hentry > div.entry-meta > span > span.author.vcard > a

This matches authors on Distilled’s blog pages, so you’ll want to add your own unique selector.

Navigate to Tags > New > Custom HTML Tag > and paste the script into the custom HTML tag box.

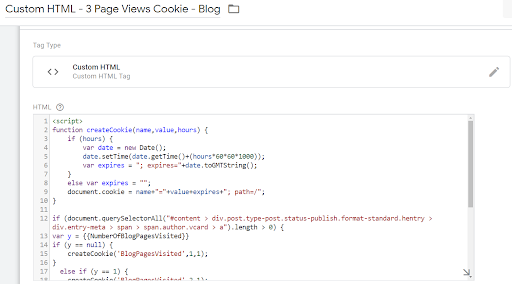
You’ll want to ensure your tag name is descriptive and intuitive. Google recommends the following tag naming convention: Tag Type - Detail - Location. This will allow you to easily identify and sort related tags from the overview tag interface. You can also create separate folders for different projects to keep things more organized.

Following Google's example, I’ve called my tag Custom HTML - 3 Page Views Cookie - Blog.

Once you’ve created your tag, remember to click save.

Step 2: Create a trigger

Creating a trigger will define the conditions that will fire your custom HTML tag. If you want to learn more about triggers, you can read up on Simo Ahava’s trigger guide.

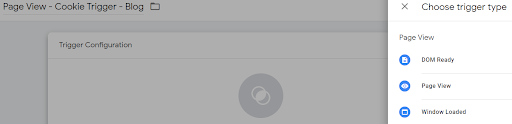
Navigate to Triggers > New > PageView.

Once you’ve clicked the trigger configuration box, you’ll want to select “Page View” as a trigger type. I’ve also named my trigger Page View - Cookie Trigger - Blog, as I’m going to set up the tag to fire when users land on blog content.

Next, you’ll want to define the properties of your trigger.

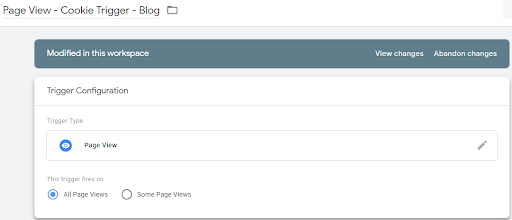
Since we’re relying on the CSS selector to trigger the cookie across the site, select “All Page Views”.

Once you’ve defined your trigger, click save.

Step 3: Create your variable

Just like how a Custom HTML tag relies on a trigger to fire, a trigger relies on a variable. A variable defines a value that a trigger needs to evaluate whether or not a tag should fire. If you want to learn more about variables, I recommend reading up on Simo Ahava’s variable guide.

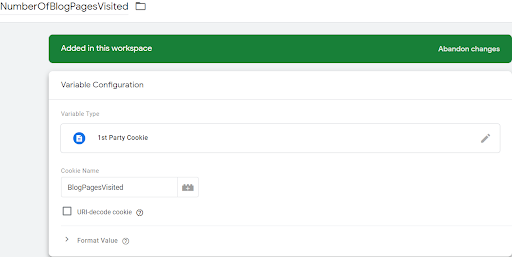
Head over to Variables > User-Defined Variables > Select 1st Party Cookie. You’ll also notice that I’ve named this variable “NumberOfBlogPagesVisited” — you’ll want this variable name to match what is in your cookie code.

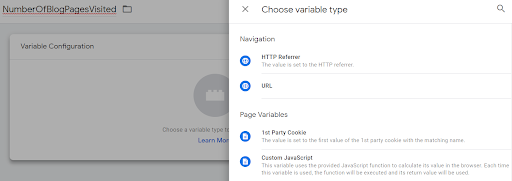
Having selected “1st Party Cookie," you’ll now need to input your cookie name. Remember: the cookie name needs to replicate the name you’ve given your cookie in the code. I named my cookie BlogPagesVisited, so I’ve replicated that in the Cookie Name field, as seen below.

Step 4: Create your event tag

When a user triggers a third-page view, we'll want to have it recorded and sent to GA. To do this, we need to set up an "Event" tag.

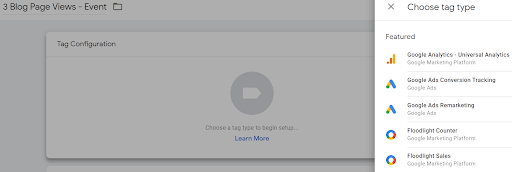
First, navigate to Tags > New > Select Google Analytics - Universal Analytics:

Once you’ve made your tag type “Google Analytics - Universal Analytics”, make sure track type is an “Event” and you name your "Category" and "Action" accordingly. You can also fill in a label and value if you wish. I’ve also selected “True” in the “Non-interaction Hit” field, as I still want to track bounce rate metrics.

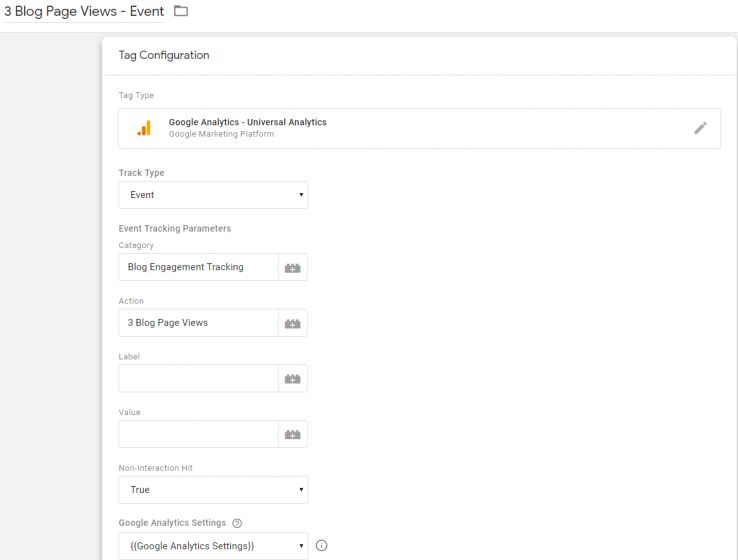
Finally, you’ll want to select a GA Setting variable that will pass on stored cookie information to a GA property.

Step 5: Create your trigger

This trigger will reference your event.

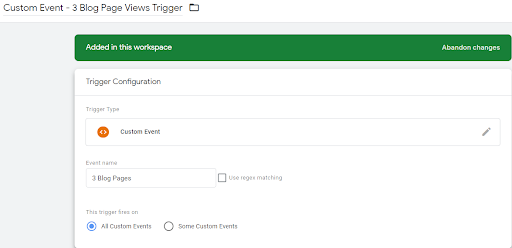
Navigate to Trigger > New > Custom Event

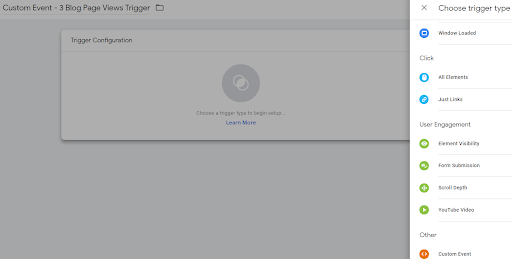
Once you’ve selected Custom Event, you’ll want to ensure the “Event name” field matches the name you have given your event in the code. In my case, I called the event “3 Blog Pages”.

Step 6: Audit your cookie in preview mode

After you’ve selected the preview mode, you should conduct an audit of your cookie to ensure everything is firing properly. To do this, navigate to the site you where you’ve set up cookies.

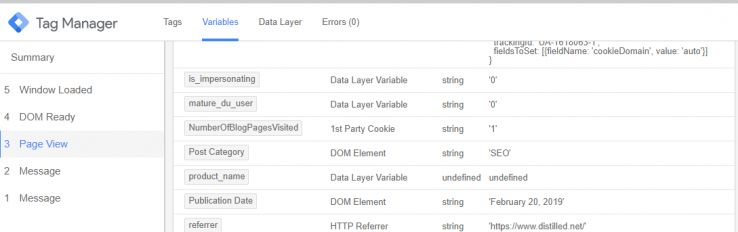
Within the debugging interface, head on over to Page View > Variables.

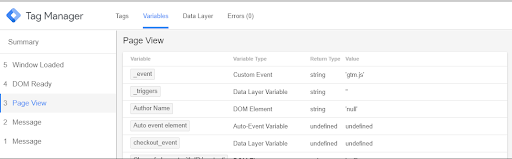
Next, look to a URL that contains the CSS selector. In the case of the client, we used the CSS selector that referenced an on-page author. All their content pages used the same CSS selector for authors. Using the GTM preview tool you’ll see that “NumberOfBlogPagesVisited” variable has been executed.

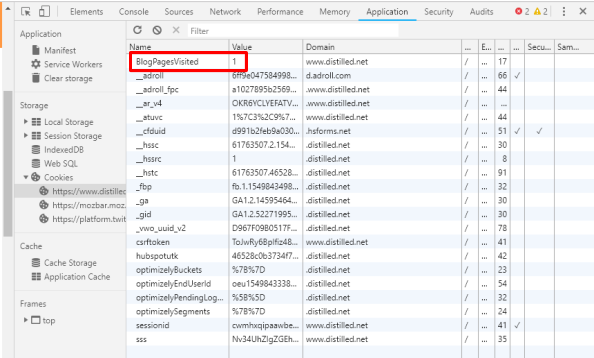
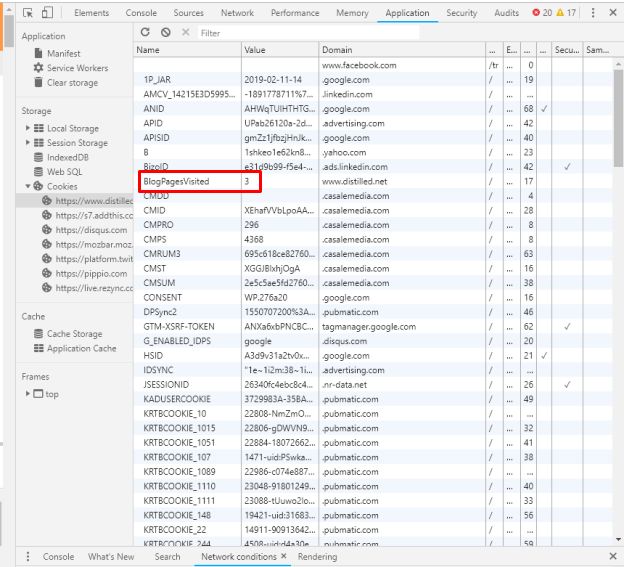
And the actual “BlogPagesVisited” cookie has fired at a value of “1” in Chrome DevTools. To see this, click Inspect > Application > Cookies.

If we skip the second-page view and execute our third-page view on another blog page, you’ll see that both our GA event and our Custom HTML tag fired, as it’s our third-page view.

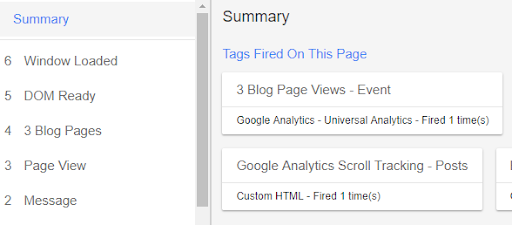
You’ll also see the third-page view triggered our cookie value of “3” in Chrome DevTools.

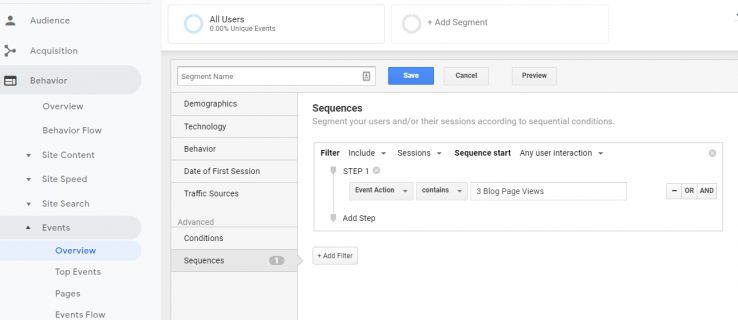
Step 7: Set up your advanced segment

Now that you’ve set up your cookie, you’ll want to pull the stored cookie data into GA, which will allow you to manipulate the data as you see fit.

In GA, go to Behaviour > Events > Overview > Add Segment > New Segment > Sequences > Event Action > and then add the event name you specified in your event tag. I specified “3 Blog Page Views."

And there you have it! 

Conclusion

Now that you know how to set up a cookie in GTM, you can get heaps of additional insight into the engagement of your content.

You also know how also to play around with the code snippet and iterate the number of page views required to fire the cookie event as well as the expiration of the cookies at each stage to suit your needs.

I’d be interested to hear what other use cases you can think of for this cookie, or what other types of cookies you set up in GTM and what data you get from them.

Sign up for The Moz Top 10, a semimonthly mailer updating you on the top ten hottest pieces of SEO news, tips, and rad links uncovered by the Moz team. Think of it as your exclusive digest of stuff you don't have time to hunt down but want to read!

* Checkbox GDPR is required

*

I agree

Will you like to book a consultation today?

We promise you’ll be glad to have us as the only premium website developer you’ve ever had!

Will you like to book a consultation today?

We promise you’ll be glad to have us as the only premium website developer you’ve ever had!

Bear Design - WordPress Development

Bear Design provides website development and design, creating content uploaded websites and improving web page placements and web traffic. Bear Design websites are unique, easy to use and responsive. Site owners can easily edit the content, or can trust the Bear Design & Communications to keep them up to date and supply quality content regularly.


GET IN TOUCH
160 City Road, EC1V 2NX London, United Kingdom
Monday – Thursday: 9:00 AM – 5:00 PM
Friday: 9:00 AM – 2:00 PM

WE ARE IN LONDON

Bear Design - WordPress Development

Bear Design provides website development and design, creating content uploaded websites and improving web page placements and web traffic. Bear Design websites are unique, easy to use and responsive. Site owners can easily edit the content, or can trust the Bear Design & Communications to keep them up to date and supply quality content regularly.


WE ARE IN LONDON

GET IN TOUCH
160 City Road, EC1V 2NX London, United Kingdom
Monday – Thursday: 9:00 AM – 5:00 PM
Friday: 9:00 AM – 2:00 PM

Bear Design - WordPress Development

Bear Design provides website development and design, creating content uploaded websites and improving web page placements and web traffic. Bear Design websites are unique, easy to use and responsive. Site owners can easily edit the content, or can trust the Bear Design & Communications to keep them up to date and supply quality content regularly.


GET IN TOUCH
160 City Road, EC1V 2NX London, United Kingdom
Monday – Thursday: 9:00 AM – 5:00 PM
Friday: 9:00 AM – 2:00 PM

WE ARE IN LONDON

© Made with by Bear Design

© Made with by Bear Design

    We are Bear Design

    WE DESIGN

    YOUR WORLD

    Bear Design & Communications Ltd.

    Address : 160 City Road, EC1V 2NX London, United Kingdom
    Phone : +36 702 448 100
    Email : [email protected]

    Opening hours :
    Monday – Thursday: 9:00 AM – 5:00 PM
    Friday: 9:00 AM – 2:00 PM

    Are you sure?
    You must approve our cookie policy to use our site. I you refuse it you will redirect to the Google.
    Refuse
    Approve Cookies
    Cookie Policy
    Cookie Policy
    This Bear Design Cookie Policy (“Policy”) outlines the general policy, practices, and types of cookies that Bear Design And Communications Ltd.. (“Bear Design”, “we”, “us” or “our”) may use to improve our services and your experience when visiting our websites.Cookies are small pieces of text used to store information on web browsers. They’re used by many websites to store and receive identifiers and other information on devices, such as a handheld phone or computer. Our site and services use cookies and other similar technologies (collectively in this Policy, “cookies”), in order to provide a better service to you and to generally improve our sites and services. For example, we may use cookies to help direct you to the appropriate part of our websites, by indicating that you are a repeat visitor. We may also use information to present you with services that are matched to your preferences.Some portions of our websites are functional without cookies, and you may generally choose whether to accept cookies. Most web browsers are set to accept cookies by default, however, you may be able to delete cookies yourself through your browser’s cookie manager. To do so, please follow the instructions provided by your web browser. Please note that disabling cookies will reset your session, disable auto-login, and may adversely the availability and functionality of our websites and the services we can provide to you.As part of our services, we may also place cookies on the computers of visitors to websites protected by Bear Design. We do this in order to identify malicious visitors, reduce the chance of blocking legitimate users, and to provide customized services.Our websites use first party cookies (i.e., cookies set directly by Bear Design) as well as third party cookies, as detailed in the table below.
    Type of CookieWhy we use these cookiesWho serves them and where can you find out more information?
    Analytics and research of usersThese are used to understand, improve, and research users visiting //beardesign.me and their needs for our product offerings. For example, we may use cookies to understand what pages a user browses before submitting a sales request form. We do not share information about this analysis with any third parties.Selected third parties listed and defined as follows:
    • Google Analytics – Web traffic tracking – //www.google.com/policies/privacy/
    • Bing – Conversion tracking from Bing ads – https://advertise.bingads.microsoft.com/en-us/resources/policies/microsoft-bing-adsprivacy-policy
    • Doubleclick – Google advertising platform that analyzes browsing activity across website to establish user profile – //www.google.com/policies/technologies/ads/
    • Twitter – Analyzes browsing activity across website to establish user profile – https://support.twitter.com/articles/20170514
    • Facebook – Analyzes browsing activity across website to establish user profile – https://www.facebook.com/policies/cookies/
    A user can delete these cookies through browser settings.
    Improving Website experienceThese provide functionality to help us deliver a better user experience for our website. For example, cookies help facilitate chats with our sales representatives, allow you to search the website, and deliver the user quickly to their intended website location.1st party and selected third parties as defined below:
    • __cfduid 3rd party cookie – This cookie is strictly necessary for Cloudflare’s security features
    • __hssc Cookie for keeping track of sessions. This is used to determine if we should increment the session number and timestamps in the __hstc cookie. It contains: the domain, viewCount (increments each pageView in a session), session start timestamp. (Expires: 30 min)
    • __hssrc Whenever HubSpot changes the session cookie, this cookie is also set. We set it simply to the value “1”, and use it to determine if the user has restarted their browser. If this cookie does not exist when we manage cookies, we assume it is a new session. (Expires: None. Session cookie)
    • __hstc The main cookie for tracking visitors. It contains: the domain, utk (see below), initial timestamp (first visit), last timestamp (last visit), current timestamp (this visit), and session number (increments for each subsequent session) (Expires: 2 years)
    • hsfirstvisit This cookie used to keep track of a user’s first visit. (Expires: 10 years)
    • hubspotutk This cookie is used for to keep track of a visitor’s identity. This cookie is passed to HubSpot on form submission and used when deduplicating contacts. (Expires: 10 years)
    • wordpress_ WordPress cookie for a logged in user.
    • wordpress_logged_in_ WordPress cookie for a logged in user.
    • wp-settings- WordPress also sets a few wp-settings-[UID] cookies. The number on the end is your individual user ID from the users database table. This is used to customize your view of admin interface, and possibly also the main site interface.
    • wp-settings-time- WordPress also sets a few wp-settings-{time}-[UID] cookies. The number on the end is your individual user ID from the users database table. This is used to customize your view of admin interface, and possibly also the main site interface.
    • __cfduid 3rd party cookie – This cookie is strictly necessary for Cloudflare’s security features
    A user can delete these cookies through browser settings.
    LAST UPDATE: 24.01.2018, LONDON
    Approve
    Refuse
    Welcome
    We use cookies to ensure that we give you the best experience on our website. Before you continue browsing you must approve or refuse our cookie policy.
    Approve
    Refuse
    Cookie Policy